

Basics of Terraform: Why, What and How
Understand the basics of Terraform with examples and commonly used commands


Before jumping directly into what is terraform, let's build an understanding of the basics, like what is IaC, what problems it solves and what is terraform.
Then we will see how to use terraform to create and manage the resources by taking an example of a basic local file resource.
Problem
Long back in the pre-cloud era, the total turnaround time of provisioning the infrastructure resources would range from a few days to months. Scaling the infrastructure on demand was also not quick. The things were not automated which would also lead to human errors as well.
With the advent of cloud platforms, the time to spin up infra and time to market applications significantly reduced, making it much more efficient than the traditional IT processes.
With cloud platforms, we do not have to manage actual hardware assets like the traditional IT model. The data centre and hardware assets are managed by cloud providers. These cloud providers have a management console - a nice UI via which you can provision resources. But still, there were a few problems here.
Once provisioned, systems still go through different teams and a lot of process overhead, which could again take time and also lead to human error, hence again this approach was not feasible in large organizations.
Solution 💡
The cloud providers also exposed a set of APIs via which we could automate infrastructure provisioning. This opened up a whole new world of automation.
Initially, every company was solving the same problem of writing some scripts trying to automate infra provisioning, installing required software on infra, configuration, and deploying faster and consistently by leveraging the APIs of these cloud providers. These tools eventually paved the way for IAC(Infrastructure as Code). Several IAC tools were developed later which solved the problems that everyone was facing.
Infrastructure as Code, as the name implies means writing and executing code to create, update or destroy infrastructure components. With IACs, we can manage any infrastructure components like compute instances, databases, network components, etc. by writing it in a simple human-readable high-level language.
There are various types of IACs currently present like Terraform, Ansible, AWS Cloudformation, etc.
Types of IAC tools: 🛠
Configuration management tools - These tools are commonly used to install and manage software on existing infrastructure like servers, networking devices, etc. The most commonly used tools in this category are Ansible, Chef, puppet, etc.
Sever templating tools - These tools are used to create a custom image of a VM or a container. These images already contain all the required software and dependencies on them, hence eliminating the need to install software or additional dependencies once they are deployed, hence making them immutable. This includes tools like Docker, Packer or Vagrant.
Provisioning tools - These tools allow the provisioning of infrastructure components ranging from compute resources, VMs, VPC, or even database and network components. Terraform is the most common and widely used IaC tool in this category.
Terraform 🏗
Terraform is an IAC tool which allows us to manage and destroy infrastructure.
There are other resource provisioning IAC tools like AWS Cloudformation but they allow creating resources only on AWS.
One of the best parts about terraform is that it is vendor-agnostic. We can use Terraform to provision and manage infrastructure on any major cloud provider. Terraform has provider plugins which we can use for all major cloud providers.
Another best thing about terraform is its ability to deploy infrastructure across multiple platforms including private or public cloud, on-premises or various cloud providers.
How does terraform manage infrastructure on so many different platforms?
It is achieved through the Provider!
Providers are a logical abstraction of an upstream platform API. These providers enable terraform to manage a wide range of infrastructure components on third-party platforms like AWS, GCP, Azure, etc through their APIs.
These infrastructure components could be-
Compute instances like VMs, etc.
Network infrastructure like DNS, etc.
Monitoring tools like Grafana, Datadog, etc.
Database instances like MySQL, Postgresql, MongoDB, etc.
Version control systems like Github, bitbucket or GitLab.
There are tons of Terraform providers which are publicly available for use. It can be found at terraform registry - https://registry.terraform.io/search/providers
We will use one of the terraform providers available in this registry for creating a file on the local system. To use terraform, we need to use its language called HCL(Hashicorp configuration language)
It is a simple declarative language by which we can define infra to be provisioned, as blocks of code.
By declarative, it means that the code is defined in a way which declares the state we want the infra to be in(i.e. the desired state)All infra resources can be defined in the configuration file with the
.tfextension. The syntax is quite easy and beginner friendly.
Let's create a terraform file in the local system with .tf extension. We will be using the local provider to create a local file for demonstration purposes.
Create a new project directory by name tf-local with the below content -
provider "local" {
  // attributes
}

resource "local_file" "country" {
    filename="./country.txt"
    content="My favourite country is India"
}
This is how a resource to be created is declared in terraform. Let's dissect the above file -
local_fileis one of the resources forlocalprovider.- Every object that terraforms manages is called a resource. Resources can be the compute instances, DB instances, or even on-premise or a file on local system as above.
countryis the resource name, which is a logical name given to a resourcefilenameandcontentare the arguments of thelocal_fileresource.
Each provider has its own set of resources and each resource has its own set of arguments. These details about the provider can be found in terraform registry itself.
For the local provider used above, you can refer -https://registry.terraform.io/providers/hashicorp/local/latest/docs
The above terraform file implies that once it is executed, it should create a file country.txt in the local system with content as My favourite country is India
In any infrastructure, there are 2 states -
Current state - which is the current environment state.
Desired state/target state - which is the environment in which we want our infrastructure to be.
The state is the blueprint of the infrastructure deployed by Terraform. Terraform can read attributes of existing infra components by configuring the source. This can be used to later configure other resources within terraform.
Terraform workflow
Terraform takes care of what is required to go from the current state to the desired state. To do this, it works in 3 phases -
init - In this phase, terraform initializes the project and identifies and downloads providers to be used for the target/desired environment.
plan - In this phase, terraform drafts the plan to get to the target state. It tells what will be the consequence of executing the changes(for example- one file will be created).
apply - In this phase, it makes the necessary changes required in the environment to bring it to the desired/target state.
Create resource
Let's run the terraform commands for the above phases. Go to the tf-local the directory that we created and run the below commands one by one
terraform init
terraform plan
terraform apply
Lets understand the output of each of these commands
The output of terraform init command -

It will install the latest version of local provider from the terraform registry.
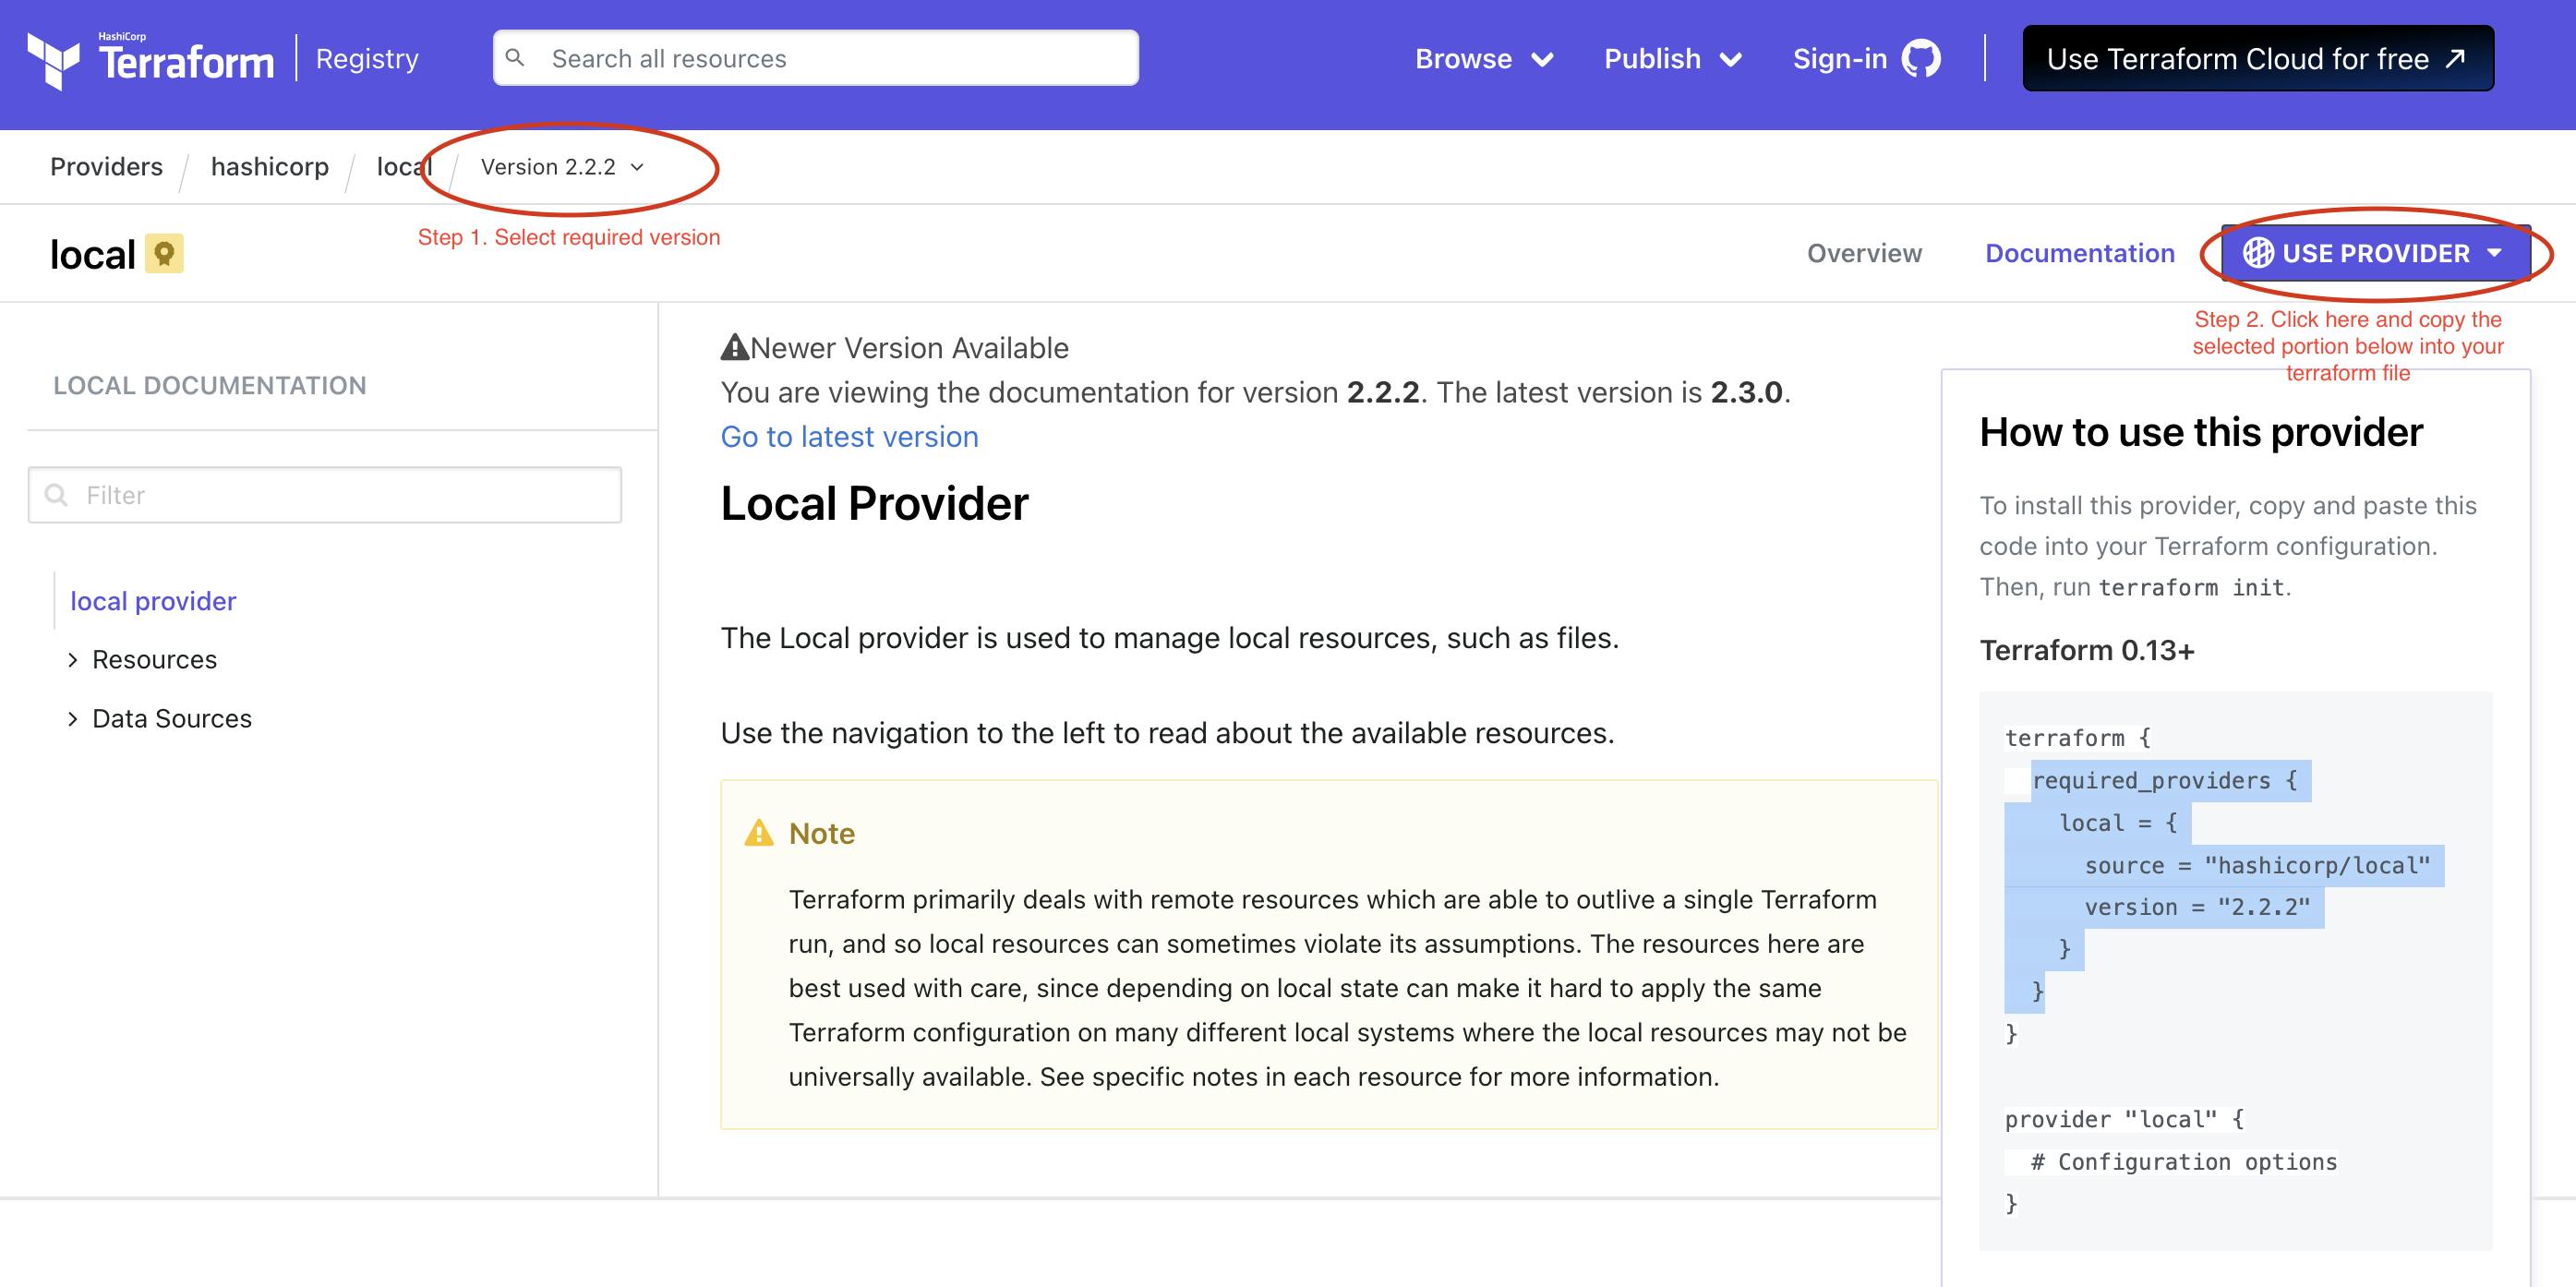
You can also specify the version specifically if you want to install older ones using the below steps -
The output of terraform plan command -
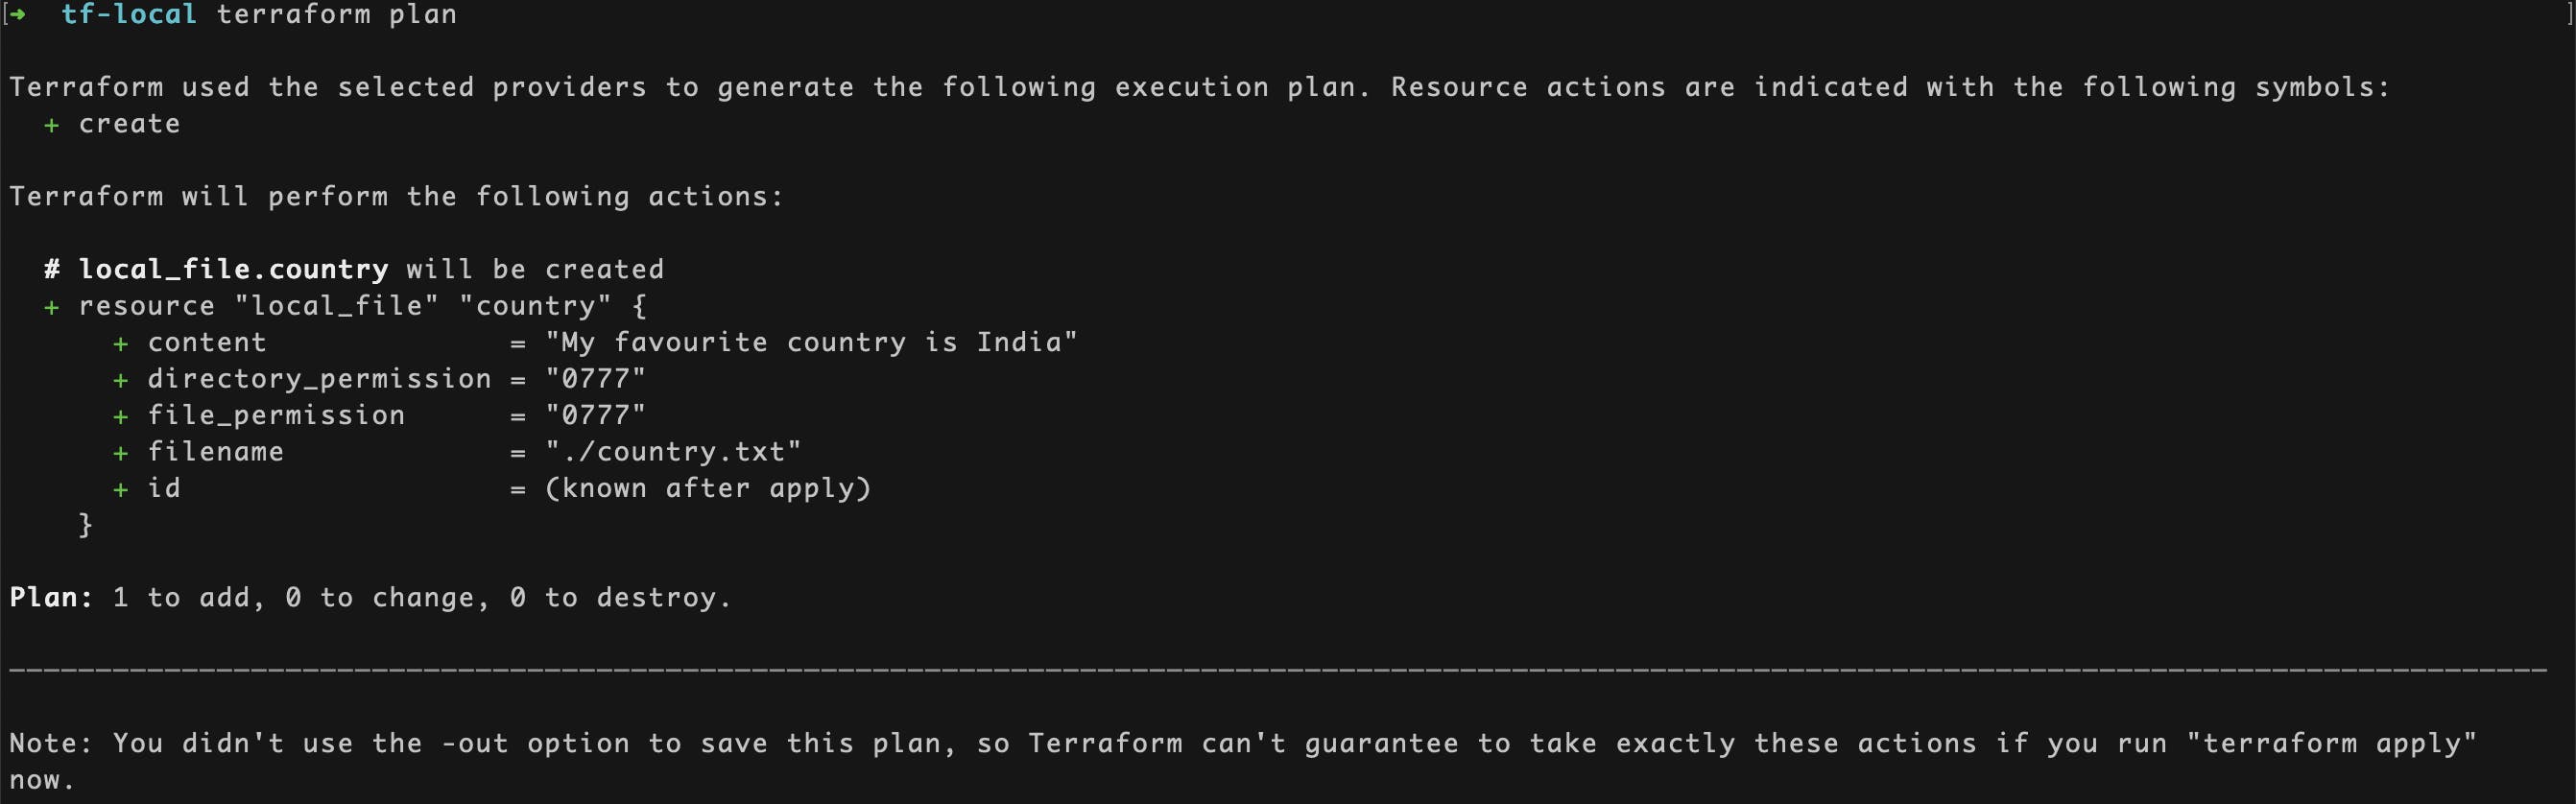
As you can see, it drafts the whole plan of what it will do once you apply changes, i.e. a file country.txt will be created with the content as specified in tf file, and with default permission of 0777 .
The output of terraform apply command -
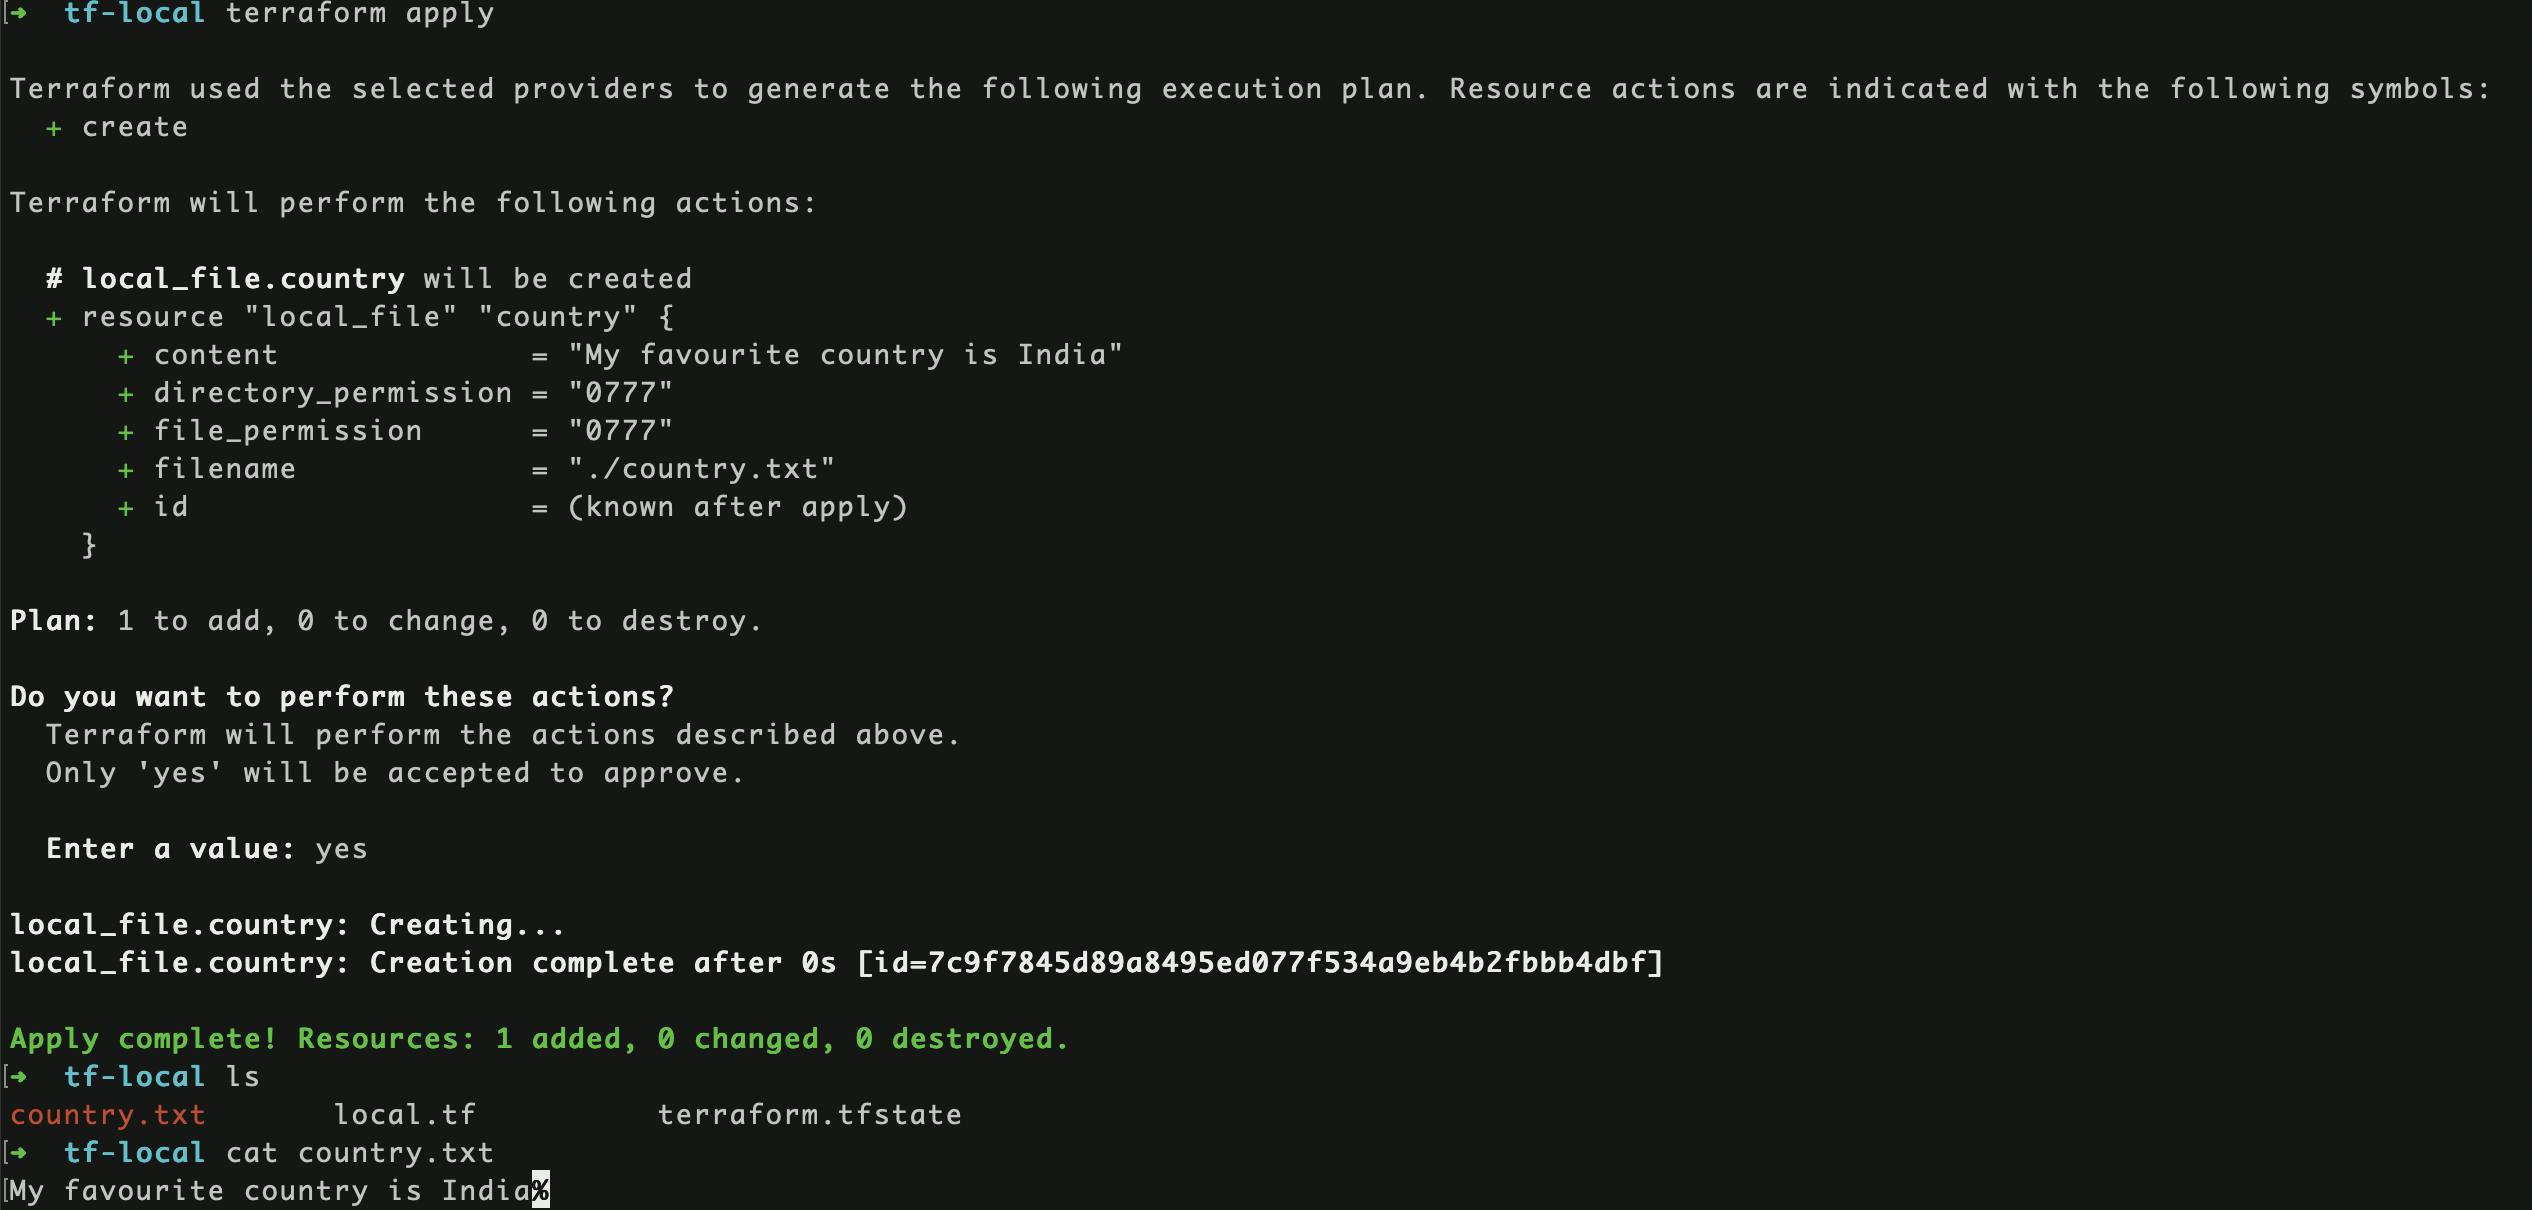
The above command creates the resource country.txt with the specified content. You can verify this by running cat country.txt from the command line.
Update and destroy resources
Let's update the file permission to 0700 of the above country.txt file using terraform code changes.
Append the file_permission attribute like shown below in the same local_file country resource in the terraform file.
resource "local_file" "country" {
        filename="./country.txt"
        content="My favourite country is India"
        file_permission="0700" # ADDED
}
Now, let's see the change in terraform state by running the terraform plan command
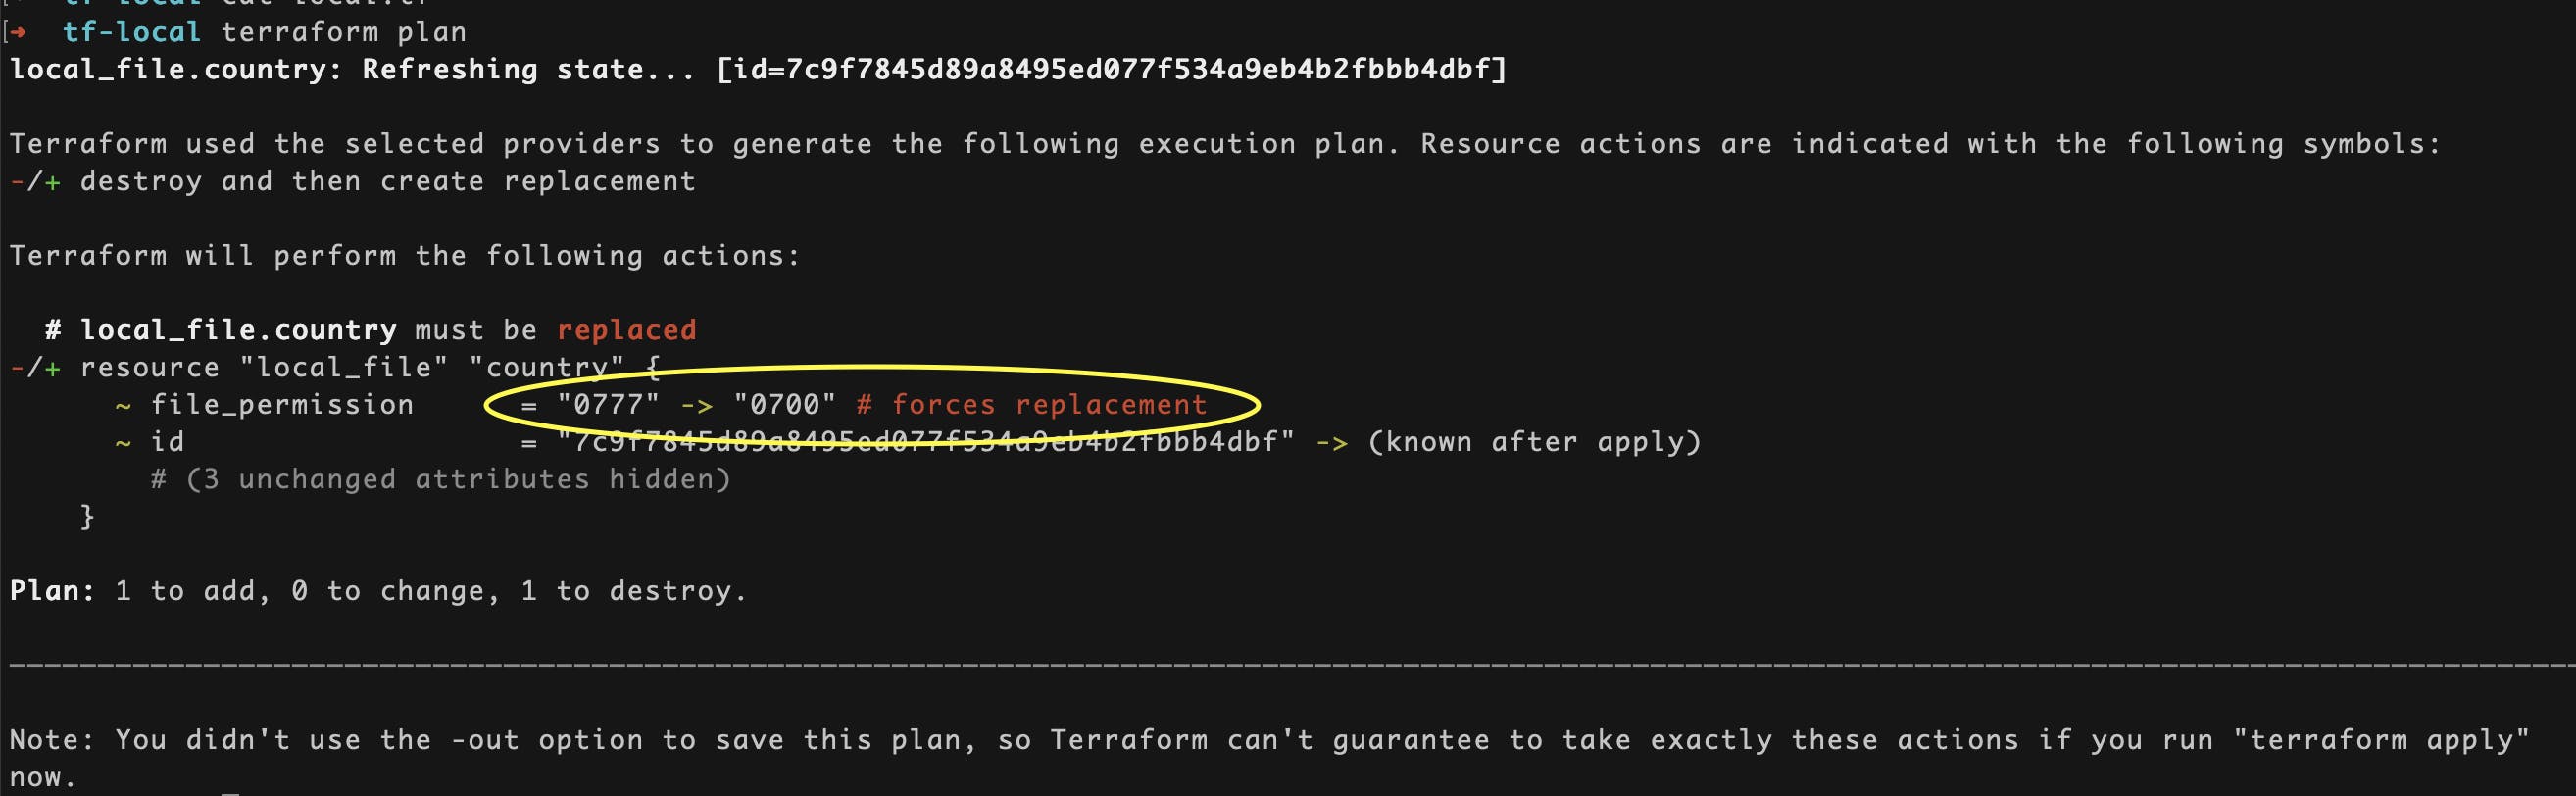
As you can see it says the file_permission will be replaced from default being 0777 to the new value 0700
Let's run the terraform apply command
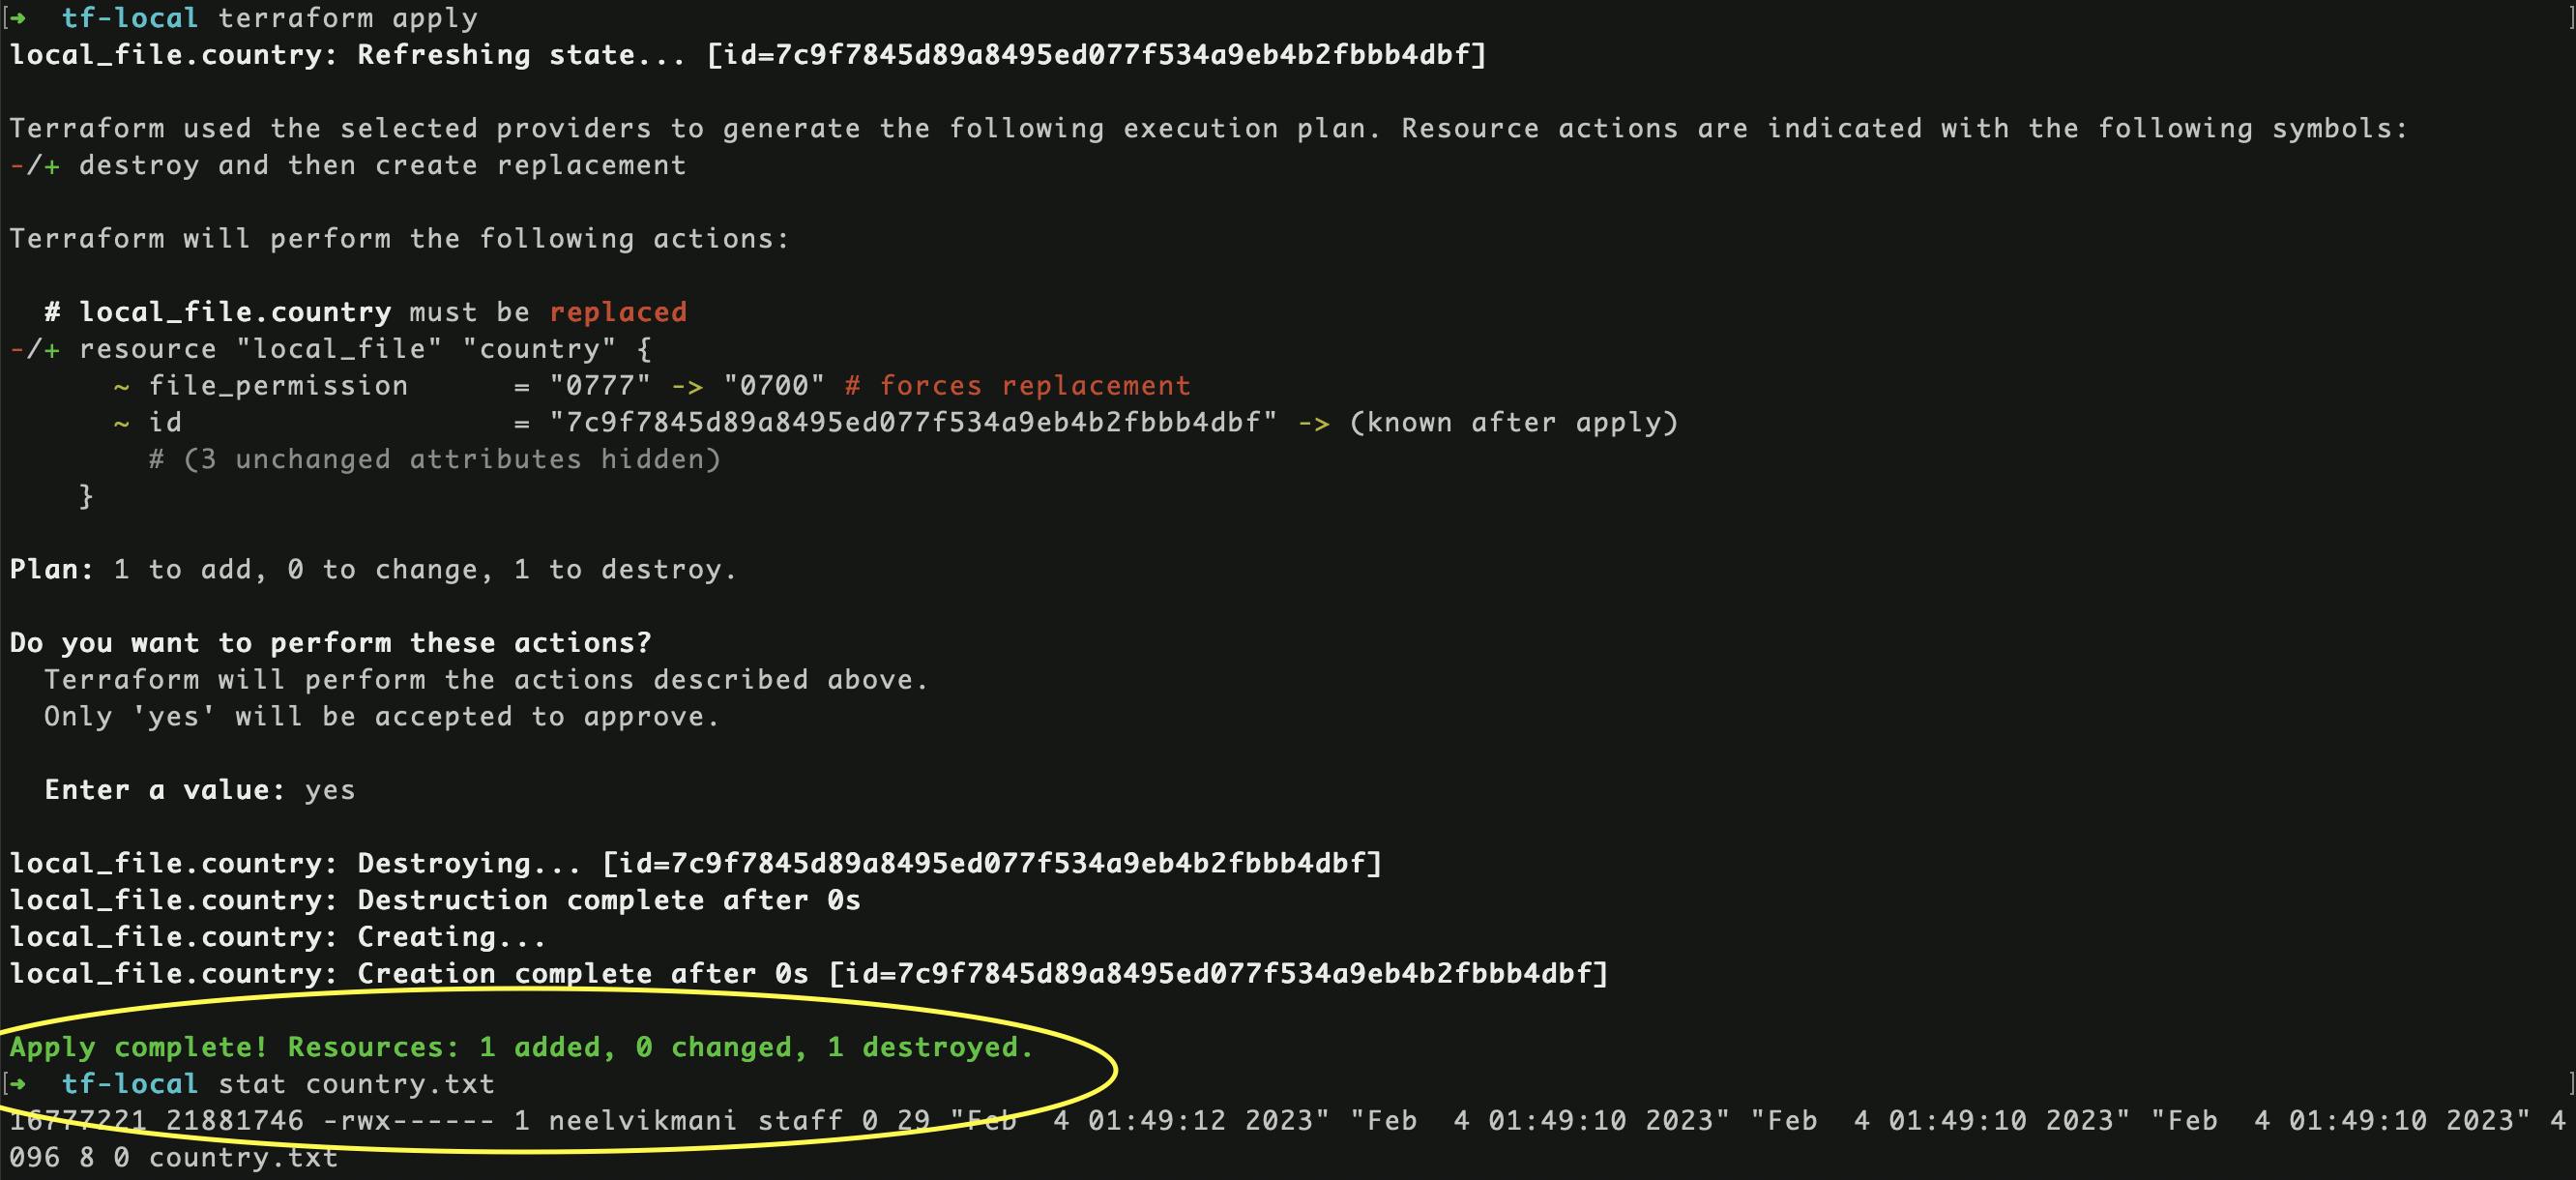
In the above screenshot, after running the terraform apply, we can also check the file permission for country.txt by running the command stat country.txt. It rightly signifies the permission(-rwx------) that we wanted it to be in.
In case you don't have an idea what
0700or-rwx------signifies, these are the notations which specify the permissions of a file. To know more about them, I would suggest you go through this (symbolic and numeric notation)
Create multiple resources
Terraform allows the creation of multiple resources within the same file by just writing a new block for each resource.
We will add one more resource random_shuffle to the existing terraform file. This resource belongs to random provider (documentation for reference)
provider "random" {
  # Configuration options
}

resource "random_shuffle" "country_shuffle" {
  input        = ["India", "Germany", "USA", "London"]
  result_count = 1
}
Now, since we are also adding a new provider, we will need to run through all the lifecycle stages, i.e. init, plan and apply
Run the below commands one by one
terraform init
terraform plan
terraform apply
terraform init - installs the newly added random provider by downloading it from registry
terraform plan - signifies that the country_shuffle will be created, and the result will be known once we run the apply command
terraform apply - applies the required changes
Once this runs, we can check the result of country_shuffle in the terraform.tfstate file created in our directory.
The tfstate file contains the current state of terraform and is updated whenever the state of the environment changes as we add or update any resource

As we can see, it randomly chose the USA value,
We can programmatically capture this output and even pass it to some other resource in our terraform file. This is explained in the below section.
Resource attribute reference
In the real world, it is bound to happen that multiple resources depend on each other. What if we want to use the output of one resource to be an input of other?
This can be done in terraform using resource attribute reference.
Let's consider the above example where we want to use the output of random_shuffle resource and provide it in the content of local_file country resource
resource "local_file" "country" {
    filename="./country.txt"
    content="My favourite country is ${random_shuffle.country_shuffle.result[0]}" # UPDATED
    file_permission="0700"
}
We are updating the content of our local_file country resource with the value retrieved from random_shuffle (country_shuffle) resource output.
With the above changes, terraform automatically understands that the local_file country resource is dependent on the random_shuffle resource, so random_shuffle resource needs to be applied first before country resource.
This is called implicit dependency, as it is understood based on the given reference expression, without our need to tell to terraform explicitly.
Let's run terraform plan and apply after making the above changes.


As you can see above, the content was updated as we expected it to be.
Terraform also supports explicit dependency where we can provide depends_on attribute like below -
resource "local_file" "country" {
     content = "London"
     depends_on = [ random_shuffle.country_shuffle ]
}
This is necessary only when a resource relies on some other resource indirectly and it does not make use of any reference expression.
Input variables
We have used arguments till now where the values are directly hard coded in terraform file. Instead of hardcoding values(which may limit reusability), we can also create the input variables in Terraform.
To assign variables, let's create new config files variables.tfwith the below content.
variable "filename" {
    default = "/country.txt"
}
Now to use it in our main file, we can rename the filename values to var.filename
resource "local_file" "country" {
    filename=var.filename # UPDATED
    content="My favourite country is ${random_shuffle.country_shuffle.result[0]}"
    file_permission="0700"
}
We can also provide the variable data type in our variable definition file. This is optional, but when used, it strictly enforces the type of the variable being used, like string, number, bool, etc.
Apart from the above, terraform also supports additional types like lists, maps, objects, etc. Let's see a couple of examples below
List type:
  variable "list_demo" {
      default = ["a","b","c"]
      type = "list"
  }
We can access var.list_demo[0] in the main terraform file
We can also enforce the type of values in the list; by specifying the type as
list(string)for list values being string type.Map type:
  variable "map_demo" {
      type = "map"
      default = {
          "foo" = "foo content"
          "bar" = "bar content"
      }
  }
Now, we can access this in our main terraform file like
var.map_demo["foo"]Object type:
  variable "object-demo" {
      type = object({
              name = string
              age = number
              country = list(string)
      })

      default = {
          name = "foo"
          age = 4
          country = ["India", "USA", "London"]
      }
  }
By default, if we don't provide the default values of variables, then we will be prompted in an interactive way to provide values while we run terraform plan or terraform apply.
In our example, let's remove the default value for filename variable that we had defined.
variable "filename" {
    # default = "./country.txt" # COMMENTED OUT
}
Now if we run terraform plan, we will be prompted for providing value in CLI like below-

However, if we don't want interactive mode, we can also make use of cmd flags like the below -
terraform plan -var "filename=./country.txt" [-var ....]

Apart from the above 2 options -
We can also make use of env variables
  ➜ export TF_VAR_filename="test.txt"
  ➜ terraform plan
If we set this, then it becomes the default value unless we provide some value in the cmd flag.
While dealing with lot of variables, we can also make use of variable definition files like below
Create a file with name
variables.tfvarsand with below contentfilename = "test2.txt"Now we can provide the file name as a cmd flag -
terraform plan -var-file variables.tfvars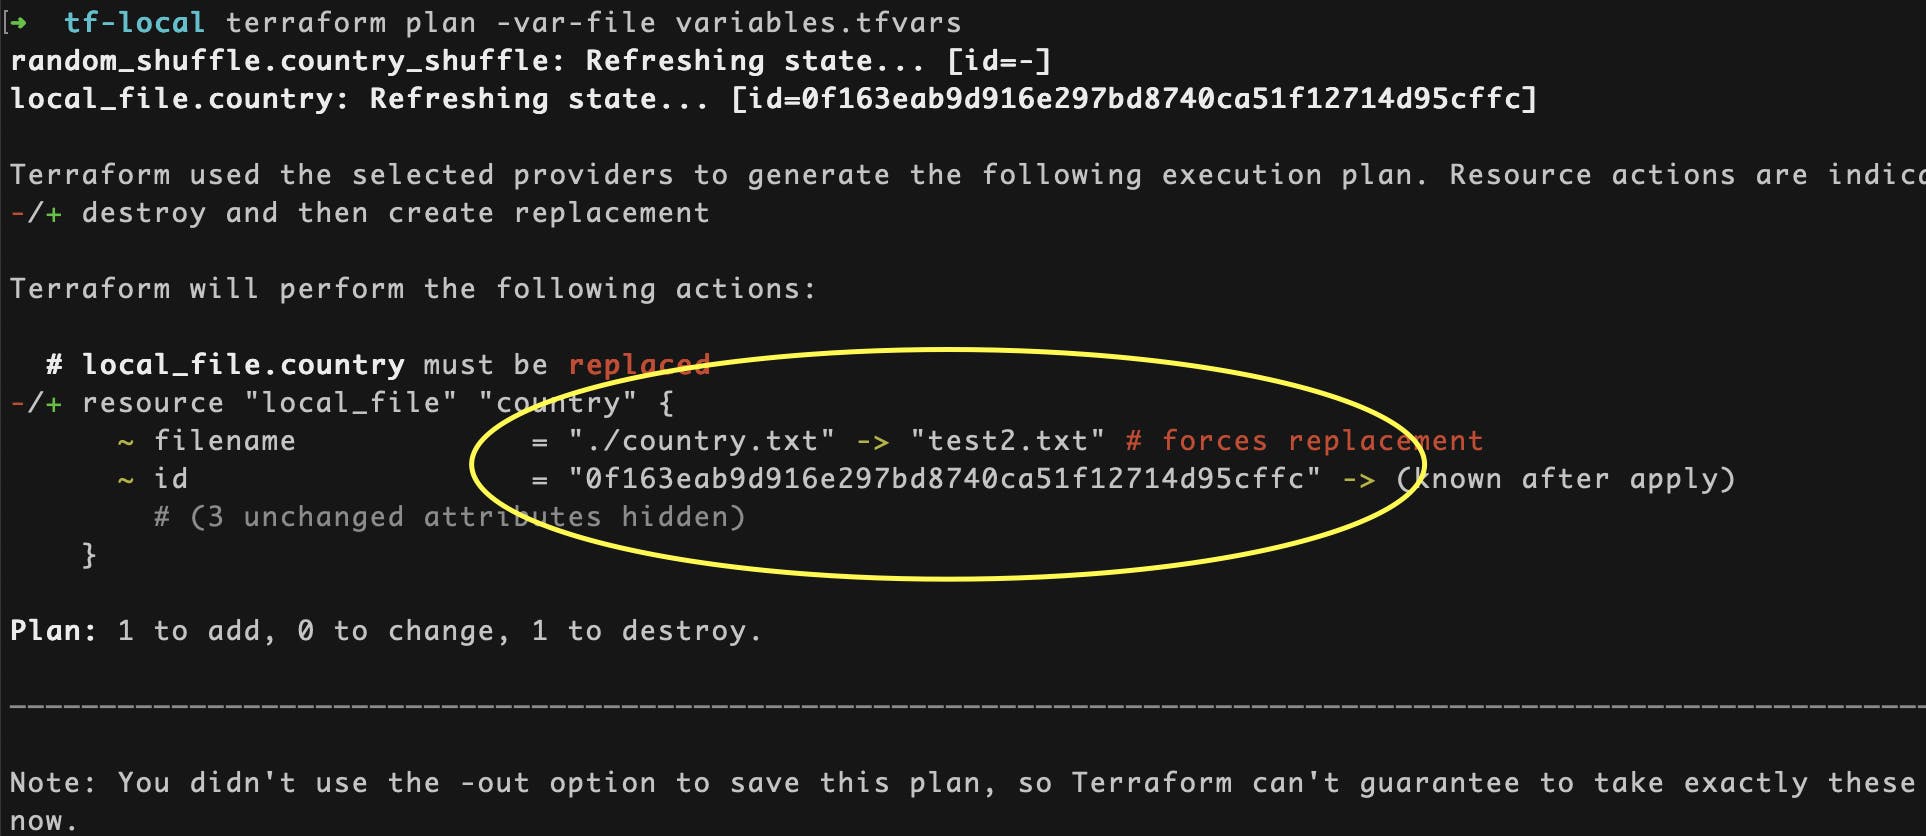
Output variables
These variables can be used to store the value of an expression in terraform.
Let's take an example in our use case, we know country resource will generate some identifier(id) when we run apply command. To save this id, we can create an output block
output country_id {
    value = local_file.country.id
    description = "File resource ID" # optional
}
We can see this output variable once we perform terraform apply like below

Now you may think about where can we use this output variable. 🤔
We can use this when we want to display it on some UI or pipeline or if we want to provide the output as input to some other IaC tool like Ansible, etc.
terraform output - Prints all the output variables mentioned in terraform file.

Lifecycle rules
Terraform resources are immutable, which means we cannot update the resource once created.
When we make some updates in the terraform file and try to apply the changes, it deletes the existing resource and then creates a new resource with an updated config. In our case, the older local_file resource is deleted first and then a new file is created.
What if we want to create an updated version first and then delete the old ones? Or if we do not want the older resource to be deleted at all(for use cases like an EC2 instance, etc)? - We can use lifecycle rules.
Just add the lifecycle block in the existing local_file country resource block like below
resource "local_file" "country" {
    filename=var.filename
    content="My favourite country is ${random_shuffle.country_shuffle.result[0]}"
    file_permission="0700"
    # ADDED
    lifecycle {
        create_before_destroy=true  # optional
    }
}
create_before_destroy - will create the new resource first and then destroy the older one
There are other lifecycle meta-attributes as well which are used vastly like prevent_destroy and ignore_changes
prevent_destroy- this won't destroy the old resource while runningapplycommand.ignore_changes- will ignore the changes made outside of terraform, and it won't sync those changes with the terraform state after the initialapply. This is useful in certain cases where the changes are made out of terraform control and we don't want to consider the changes in the terraform reconciliation phase, which will revert them unnecessarily.
Data sources
Terraform is only one of the tools which provide IAC. Infra can be created using other tools like Ansible or even via some ad-hoc scripts or manually created.
Let's say we manually create a new local file in the local directory food.txt without terraform knowing about it. We would like the terraform to know about this and use this file as a data source for the other terraform resources. This can be done via the data source.
Just manually create a food.txt file and add Pizza in this file content.
Now, add the below in the main terraform file-
data "local_file" "food" {
    filename = "./food.txt"
}
In the country resource, we can feed the content of this food.txt in our content of country resource file
Just update the content value of the country resource as below
content="My favourite country is ${random_shuffle.country_shuffle.result[0]}, and favourite food is ${data.local_file.food.content}"
Now, run the plan and apply command, and then check the test.txt file - the output will be as expected as shared below -

Other useful commands
terraform validate- Checks if the terraform config is valid or not.terraform fmt- Scans the config files and formats the code into the canonical format to improve readability
The above two commands can be run beforeterraform planand is mostly used in the build or verification phases of the CI/CD lifecycle.terraform show- Displays the current state of resources including all attributes created by terraform for that resourcesterraform output- Prints all the output variables mentioned in terraform file.terraform refresh- Used to sync terraform with real-world infra.
This is useful in case there are any changes made to a terraform resource outside its control(like a manual update). In such cases, terraform will pick it up and update the state file. This reconciliation will determine what action to take during the next applied command. Note that this command is automatically run when we run the plan and apply commandsterraform destroy- Destroys the terraform resources mentioned in the terraform file.
That's it for this article.
🚀 I have also pushed the example code explained in this article to Github.
If you found this article helpful, please comment and share this article 😃.
Let's connect 💫
You can also subscribe to my newsletter below to get an email notification on my latest posts. 💻